
Practical guide to securing FHIR APIs with TLS, SMART on FHIR/OAuth2, least-privilege scopes, token protection, consent checks, and audit logging.
A single weak API control can expose PHI in seconds, even when login looks fine. Ottehr states that FHIR API security depends on a short chain of controls that work together: TLS on every connection, SMART on FHIR with OAuth 2.0, least-privilege scopes, token and secret protection, request validation, consent checks at request time, and audit logs for every PHI touchpoint.
meta.tag, _tag, and _id search paths should enforce record-level policy and tenant isolation.FHIR APIs handle sensitive clinical data. That means they expose high-value PHI and need a tighter security baseline than a standard API. That risk level shapes every control that comes next.
For regulated deployments, audit logging, MFA, and encrypted transport should be in place from the start.
Most modern FHIR deployments use the SMART App Launch framework with OAuth 2.0 for authorization. But not all traffic should be handled the same way. In practice, you need to separate requests by pattern:
After you classify traffic and set the baseline, you can apply transport, authorization, and logging controls in that order. With those boundaries in place, the first control to put in place is transport encryption.
Use TLS for every FHIR connection. That means patient-facing mobile apps, browser sessions, and system-to-system traffic. Yes, even traffic that never leaves your network edge should stay encrypted. This lines up with ONC Health IT Certification Criterion d9, which requires secure communication channels for transmitting health information.
Don’t stop at the front door. Keep encryption in place as traffic moves through load balancers, reverse proxies, and hybrid integrations. The same goes for service-to-service links. If data passes from one point to another, TLS should stay on the whole way.
For cloud deployments, TLS should go hand in hand with a current BAA from your hosting provider.
Verify these items:
Once transport is encrypted, the next step is controlling who can call the API. SMART on FHIR does that by tying every API request to a verified identity and scoped permissions. It does this by layering OAuth 2.0 and OpenID Connect (OIDC) on top of your FHIR server.
This also matters for compliance. §170.315(g)(10) requires FHIR R4 APIs to support OAuth 2.0 and SMART on FHIR, and the 21st Century Cures Act makes standardized API authorization a practical requirement.
In day-to-day use, your setup needs to support two different access patterns. One is for patient-facing apps, where a patient authorizes an app to access their own records. The other is for provider-facing apps or backend services, where a system signs in through the client credentials flow.
For backend services, use the client credentials flow to obtain JWTs, then cache and refresh them before they expire.
Keep access tight. Use compartment-scoped access so each signed-in user can only see the data they’re allowed to see. Route reads through policy-enforced search paths instead of direct resource reads. And keep scopes narrow so access stays in line with least-privilege rules.
Verify this item:
Authentication is only the first layer. After that, you need authorization at the resource, operation, and record level. SMART on FHIR scopes define what an authenticated identity can actually touch, so treat scopes as the enforcement layer, not a box to check.
Give each client access only to the FHIR resource types and actions it needs to do its job. A scheduling app, for example, should be limited to Patient, Schedule, and Slot. For service-to-service integrations, spell out allowed actions with granular rules like FHIR:Search, FHIR:Read, and FHIR:Create. Keep deleteResource locked down to admin-only or seeding-job access.
Resource scoping by itself won't do the whole job. You also need record-level controls. Use meta.tag or _tag to isolate data by tenant, session, or sensitivity. And when your policy engine applies compartment checks on search paths, send single-resource lookups through _id= routes.
| Access Control Level | Mechanism | Security Objective |
|---|---|---|
| Resource | AccessPolicy / SMART scopes | Limits access to specific FHIR resource types |
| Operation | Action-based rules | Restricts methods to Read, Create, or Search per role |
| Record/Field | meta.tag / _tag |
Isolates data by tenant, session, or sensitivity level |
Before production, test both allow and deny cases with contract tests.
Scopes decide what an identity can reach. Tokens carry that permission from one system to another. So this part is about the whole token lifecycle: issuance, storage, transport, and audit. If someone steals a token, they get whatever that token allows.
Encrypt access and refresh tokens both in transit and at rest, and keep client secrets in a dedicated secrets manager. Refresh tokens should live in that same secrets manager, and they should rotate on every use. Require MFA for token issuance and for privileged token use. Audit logs should record token issuance, refresh, and revocation events.
Check for these controls:
Token protection is only part of the picture. The calling app or service also needs to be trusted, which leads into client and backend service authentication.
Client authentication confirms that an app or service is who it claims to be before it gets access.
For backend services where no user is involved, OAuth 2.0 client credentials is the right choice. The service signs in with a client ID and client secret, then gets a short-lived JWT. That short lifespan matters. If a token is exposed, the window for misuse stays small.
Secrets need the same level of care. Rotate client secrets on a regular schedule, and invalidate the old secret the moment the new one goes live. In production, avoid "allow-all" access policies. They’re risky and too broad. Instead, scope each client to the exact FHIR resource types and actions it needs, such as FHIR:Search and FHIR:Read. User-facing apps should follow that same least-privilege approach through SMART on FHIR.
For user-facing apps, implement SMART on FHIR to meet ONC certification requirements (§170.315(g)). Don’t just set it up and hope for the best. Validate the flow before production, and test each client in a sandbox with synthetic data first. For privileged access paths, enforce MFA and log authentication activity.
These controls map to the following ONC requirements:
| ONC Criterion | What It Covers |
|---|---|
| d1 | Ensures only authorized users and services can access sensitive data |
| d12 | Requires robust encryption for credentials and client secrets |
| d13 | Requires multi-factor authentication for identity verification |
Before any client moves to production, verify that these controls are in place:
After authorization comes validation. The job here is simple: block unsafe requests before they touch data. Every request sent to your FHIR API can become an attack path, so malformed or out-of-bounds requests should stop at the API layer, not drift deeper into the stack.
Schema validation sits at the center of this. Your API should reject any resource that does not match FHIR R4/R5 models before it reaches the data layer. You should also enforce hard limits on payload size and URL length. A 10 KB URL cap helps cut exhaustion risk. On top of that, standard FHIR request headers should be checked on every call.
Search is another place where APIs often get loose, and that creates risk fast. Be explicit about which search parameters you support, and reject everything else. Do not silently ignore unsupported parameters. That kind of behavior can make debugging messy and can open the door to policy bypasses. It also helps to use structured parameters in queries instead of raw query string concatenation, which keeps requests more consistent and easier to validate. The same approach helps stop search-based policy checks from slipping past your controls.
When policy enforcement depends on the search path, use _id= searches. When policy checks depend on compartment rules, use the search path there too.
DELETE and UPDATE should be limited to approved clients. That keeps high-impact actions on a short leash.
| Validation Check | Security Objective | Key Consideration |
|---|---|---|
| Schema Validation | Data integrity | Reject resources that don't match FHIR R4/R5 models |
| Search Whitelisting | API surface control | Block unsupported parameters; never silently ignore them |
| Payload/URL Limits | Resource protection | Cap URL length to reduce exhaustion risk |
| Header Verification | Protocol compliance | Enforce standard FHIR request headers on all requests |
| Tag Preservation | Policy integrity | Confirm meta.tag and meta.security survive round-trips intact |
| Endpoint Restrictions | Privilege control | Restrict DELETE and UPDATE to approved clients only |
Before moving to production, confirm these checks are in place:
_id=<id>), not direct readsmeta.tag and meta.security values are preserved through create and update operationsDELETE and UPDATE are restricted to approved clients onlyValidation controls what gets in. Consent and data segmentation control what each response can send back. Those are not the same job. Mix them together, and you can still leave sensitive records exposed even when authentication looks solid.
Patient consent must be enforced at request time, not assumed at login. In plain terms, your API needs to check the patient’s current consent status before it returns PHI - not just confirm that the user has a valid token. The rule is simple: check consent at request time and log every PHI release. After access is approved, filter the response so it sends only what should be disclosed.
Once a request passes validation, response filtering helps stop overexposure. Keep behavioral health, substance use, HIV, reproductive health, and adolescent records separate from general clinical data. If a single FHIR API response bundles those records together with standard clinical data, you can end up with a compliance gap. Run segmentation in the API layer before any response is assembled.
Each API response should be trimmed to the smallest clinically useful payload. Use USCDI as the default minimum. Return only the fields a given workflow needs. And be careful with FHIR custom fields. Over-extending resources with custom fields can increase interoperability problems and PHI-exposure risk.
Before moving on, confirm these controls are in place:
Next, monitor these controls so unusual PHI access is detectable and actionable.
Logging and monitoring catch the things preventive controls miss. If PHI is involved, log every FHIR action that touches it. That includes reads, writes, auth events, credential changes, and activity on custom endpoints. Then pull those logs into one place across your authentication layer, FHIR layer, and serverless layer so your team can connect the dots fast during an investigation.
Those centralized logs should feed alerting and investigation. If access suddenly spikes, failures keep repeating, or a custom endpoint starts doing something out of pattern, your team should know right away. Custom endpoints and serverless functions need to flow into that same monitoring pipeline too. Otherwise, you end up watching half the house while the back door stays open.
Testing matters just as much. Use sandboxes with synthetic data to test REST contracts, backend integrations, and write controls. Contract tests should check:
meta.tag preservationThat test output shouldn't just sit in a report. Use it to update alerts, runbooks, and response steps so your monitoring reflects what your system actually does.
You should also document the incident response plan now, not later. Spell out roles, timelines, evidence retention, and drill cadence. The reference tables below map these controls to the tasks needed for implementation.
Use these tables as a quick reference for the controls above: transport security, role-based access, and API-layer protections. They pull the main controls into one implementation-ready view, so teams can move from policy to setup without flipping back and forth.
| Insecure Pattern | Secure TLS Control | Risk Mitigated |
|---|---|---|
| Plaintext HTTP | Mandatory HTTPS (TLS 1.2 or 1.3) | Man-in-the-Middle (MitM) attacks |
| Expired or self-signed certificates | CA-signed certificates with automated renewal | Identity spoofing and trust breakdown |
| Weak cipher suites (e.g., DES, RC4) | Strong ciphers (AES-GCM, ChaCha20) | Cryptographic protocol downgrades |
| Unencrypted credential transmission | Encrypted credentials (ONC d12) | Credential theft and account takeover |
This matrix maps each role to the FHIR operations it should be allowed to perform, along with the data scope tied to that role. The goal is simple: give people and services only the access they need, and nothing extra.
| Role | Allowed FHIR Operations | Resource Scope |
|---|---|---|
| Patient | read, search |
Own records only |
| Practitioner | read, search, create, update |
Assigned patients and related clinical data |
| Administrative Staff | read, search, create, update |
Scheduling and billing data |
| Auditor | read, search |
All resources (read-only), AuditEvent logs |
| Backend Service | read, search, create |
Specific resources defined by API scope |
| System Admin | read, search, create, update, delete |
Full system access (delete for maintenance only) |
At the API layer, each control maps to a specific failure mode. That makes rollout easier to plan. If a team is short on time, it can line up controls against the risks most likely to hit first.
| API Control | Risk Addressed | ONC Mapping |
|---|---|---|
| Input Validation | Injection attacks, malformed FHIR resources, data corruption | Data Integrity (d10), Security (d1) |
| Throttling / Rate Limiting | Denial of Service (DoS), resource exhaustion | Quality Management (g4), Standardized API (g10) |
| Pagination | Memory exhaustion, slow queries, request timeouts | Standardized API (g10), Data Export (b10) |
| Safe Error Handling | PHI leakage, fingerprinting, stack trace exposure | Security (d1), Privacy (HIPAA/GDPR) |
| CORS Restrictions | Cross-origin abuse and browser-based request attacks | Secure Communication (d9), Standardized API (g10) |
Use the checklist next to prioritize rollout.
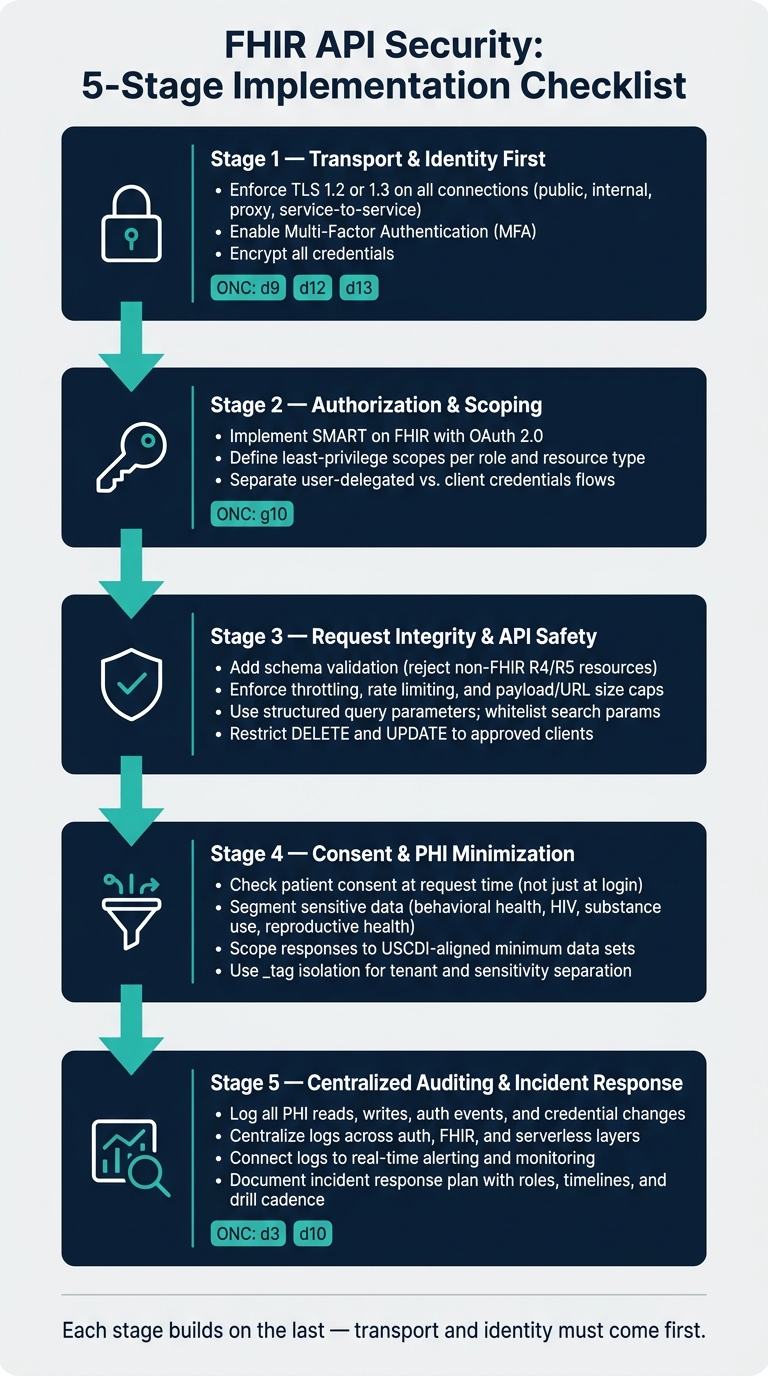
FHIR API Security: 5-Stage Implementation Checklist
Start with the controls that cut risk across every request. The flow here is simple: put transport in place first, then identity and access, then request safety, then consent and PHI limits, and finally logging and response.
Stage 1 - Transport and identity first. Lock down every connection with TLS (ONC criterion d9). Pair that with multi-factor authentication and credential encryption (criteria d13 and d12). This comes first for a reason: every control that follows depends on encrypted transport and strong sign-in.
Stage 2 - Authorization and scoping. After identity is verified, set up SMART on FHIR with OAuth 2.0 and define least-privilege rules for each role and resource type. Move user and service access to SMART on FHIR or OAuth 2.0 client credentials. Once access is narrowed, shift to request hardening.
Stage 3 - Request integrity and API safety. Add input validation, throttling, and safe error handling. For FHIR queries, use structured parameters instead of raw string concatenation to cut injection risk.
Stage 4 - Consent and PHI minimization. Add consent checks and PHI minimization after access controls are in place. Use _tag isolation to segment data and limit PHI exposure to only what each role actually needs. After you shrink exposure, bring detection and response into one place.
Stage 5 - Centralized auditing and incident response. Turn on centralized logging for reads, writes, auth events, and credential changes. Connect those logs to monitoring, run scheduled security tests, and document a clear incident response plan.
The reference tables below turn this sequence into an implementation checklist.
For teams working through the checklist above, a FHIR-native platform can help you get to production with less setup work. Ottehr can give you a secure starting point by bundling and putting into use the built-in security controls covered in this article - OAuth 2.0, MFA, credential and secret management, and access policies - instead of forcing teams to piece them together from scratch. Ottehr's backend, Oystehr, is certified for ONC criteria d3 (audit logs), d10 (auditing actions), d12 (credential encryption), and d13 (multi-factor authentication).
Its open-source architecture also makes the codebase easier to review, which can help teams spot and fix vulnerabilities faster. That can cut down on setup time. But it doesn't mean security runs on autopilot.
The platform gives you the baseline. Your team still owns policy, deployment, and monitoring. Least-privilege access policies, key management, and audit log review still depend on day-to-day decisions tied to your workflows and deployment setup. In plain English: the platform gives you the tools, but your team still has to use them well.
Use the platform for the foundation. Use your own controls for enforcement.
FHIR API security isn't one control. It's a layered model where TLS, authorization, least privilege, secret protection, consent controls, and monitoring all need to work together. If one layer is weak, risk spreads across the rest of the stack. And that stack only does its job when teams review it and keep it in good shape over time.
That's why schedules matter just as much as setup. Review OAuth 2.0 scopes, client registrations, keys, and certificates on a fixed schedule. Access tends to change faster than code, so security reviews need to keep up.
Detection also depends on follow-through. Log every PHI access event and review logs on a continuous basis. Logs don't help much on their own. They help when they lead to action.
Treat FHIR security as an ongoing control cycle, not a one-time task.
Start with access control and encryption. Set up role-based access control and fine-grained permissions so only approved users can view or use specific data.
Then lock down data in transit with FIPS-compliant HTTPS/SSL. Encrypt data at rest with AES. And turn on encrypted audit logs so you can track resource interactions for compliance and data integrity.
SMART on FHIR scopes limit PHI access by enforcing granular, role-based permissions that spell out exactly which data an application can read or write.
That means apps and services get access only to the patient records or resource types they need to do their job. The result is less exposure and a lower chance of broad, unauthorized access.
Checking consent on every request helps keep healthcare teams aligned with privacy rules like HIPAA. It also makes sure data access reflects the patient’s CURRENT permissions, not what those permissions were days or weeks ago.
Consent and authorization can change at any time. That’s why checking them on each request matters. It helps make sure only approved people can view sensitive information, which supports the need-to-know principle.
Ottehr supports this with access policies and audit logging for FHIR-native API interactions.

Tell us what you need and we'll get back to you soon.